PLESK Error: There are no available resources of this type left. Requested: 1; available: 0.

Merhabalar,
Bir gün siz de Plesk Panel ‘de aşağıdaki hatalardan birisi ile karşılaşabilirsiniz, özellikle yeni kurulum yaptıysanız eğer. Aşağıdaki hatalara şöyle bir baktığınızda (biraz da yabancıysanız) size epey korkunç gelebilir ama hayır hayır, endişe etmeyin problem çok basit; Plesk lisansını yüklemediniz ya da süresi doldu! (:
Dilerseniz Plesk için demo lisans talebinde bulunup, test edebilirsiniz;
  • Plesk demo lisans adresi -> http://sp.parallels.com/uk/products/plesk/trial/
  • Yukarıdaki adrese kayıt olun, demo talebinde bulunun e-posta adresinize gelecek olan lisans dosyasını,
  • siteadresiniz.com:8880 Tools & Settings -> License Management kısmından upload edin ve artık Plesk ‘i istediğiniz gibi kullanabilirsiniz.. (:
Problemin Sebebi / Cause : Geçersiz lisans / invalid license
Problemin Çözümü / Solition: Yeni lisans / New license

Error: There are no available resources of this type (domains) left. Requested: 1; available: 0.

Error: There are no available resources of this type (clients) left. Requested: 1; available: 0.

Warning:

Failed deployment of client
Warning:

Execution of /usr/local/psa/admin/plib/api-cli/client.php --create  -name   -notify false -owner admin -passwd '' -passwd_type encrypted -creation-date 2014-03-01 -guid 6b3c6925-b3b3-4420-bd4d-a35f3c3455b3 -ignore-nonexistent-options failed with return code 1.
Stderr is
An error occurred during customer account creation: There are no available resources of this type (clients) left. Requested: 1; available: 0.
Warning:

Failed deployment of client
Warning:

Execution of /usr/local/psa/admin/plib/api-cli/client.php --create  -name  -notify false -owner admin -passwd '' -passwd_type encrypted -creation-date 2014-05-05 -guid f650d65f-7828-4599-bf4d-3dcf4667b332 -ignore-nonexistent-options failed with return code 1.
Stderr is
An error occurred during customer account creation: There are no available resources of this type (clients) left. Requested: 1; available: 0.
Warning:

Failed deployment of client
Warning:

Execution of /usr/local/psa/admin/plib/api-cli/client.php --create  -name  -notify false -owner admin -passwd '' -passwd_type encrypted -creation-date 2014-03-19 -guid 6027bfbe-9339-428f-afdf-5c71fe435709 -ignore-nonexistent-options failed with return code 1.
Stderr is
An error occurred during customer account creation: There are no available resources of this type (clients) left. Requested: 1; available: 0.

Plesk 12 Kurulum Hatası | Install Error – CentOS /var/log/plesk/install/plesk-12

Merhabalar,

PLESK YENİ KURULUM / NEW INSTALL

Eğer siz de sunucunuza Plesk ‘in güncel versiyonunu yani Plesk 12 kurmak istiyorsanız ve sunucu işletim sisteminiz eski ya da Plesk kurulumu için gerekli uygulamalar yüklü değilse kurulum işlemi başarılı olamayacak. Dolayısı ile ya alternatif çözüm arayacaksınız ya da inat edip epey uğraşacaksınız (: Ben, problemin sebebini bulana kadar uğraştım ve problemin sebebini fark ettikten sonra, alternatif çözümden yana oldum.

Otomatik kurulum:

  • wget -O - http://autoinstall.plesk.com/one-click-installer | sh

Solution/Problemin çözümü: işletim sisteminizi güncellemekten geçiyor zaten şu an itibari ile CentOS 7 varken CentOS 5 kullanmak, çok doğru bir davranış olmaz açıkçası.
Update your server. Sample; CentOS 5 –update>> CentOS 6


Bu arada ben SolusVM üzerinde tanımlı olan CentOS-6-x86 ‘yı tercih ederek  işlemlerime başarılı bir şekilde devam ettim.

Benim sunucuda kullandığımı sandığım işletim sistemi: CentOS 6.5 iken aslında SolusVM ‘de yapılan küçük bir hatadan dolayı işletim sistemi CentOS 5 olarak kurulmuş.

cat /etc/redhat-r* <- komutu ile sunucu işletim sistemini öğrenebilirsiniz. bkz.


Dün gece saatlerinde bunlarla uğraşırken önümde birden fazla SSH ekranı açık olduğu için hata kayıtlarını tam alamadım ama aşağıdaki hatalar bu makaleye ve dolayısı ile çözüme ulaşmanız için faydalı olur umarım:


Aslına bakarsanız hatalardan da anlaşılacağı gibi bu bir veritabanı hatasıdır, veritabanı hatalı/zarar görmüş olabilir, bağlantı yolu değiştirilmiş/zarar görmüş olabilir veyahut kurulu olmayabilir. Geniş bir zaman olsaydı bu konunun detaylı teknik kısımlarını araştırıp/inceleyerek yorumlarımı aktarmak isterdim fakat; şu an bu makaleyi yazarken diğer yandan da sunucuları taşıdığım için, “çözüm, çözümdür” diyerek hızlı bir şekilde sizlerle paylaşmak istedim.

Başarılar..

***** pleks problem report *****

ERROR while trying to SMB database not created

Check the error reason (see log file: /var/log/plesk/install/plesk-12.0.0.18_installition.log), fix ..
STOP Bootstrapper 12.0.18 prep-install for BASE AT Tue ……. 2014: PROBLEMS FOUND


===> Checking for previous installation … not found.
Create user ‘psaadm’ and group ‘psaadm’
Checking for the group ‘psaadm’…


plesk 12 centos error while trying to smb database not created


ERROR while trying to SMB database not created
Check the error reason(see log file: /tmp/pp11.0.9-bootstrapper.101105.09.52.log), fix and try again
**** Product post-install failed.


Trying to check psa database…  Trying to find psa database… not found

plesk 1773 Aborted  /usr/bin/sw-engine -d safe_mode=Off -d ps

/usr/local/psa/bootstrapper/pp12.0.18-bootstrapper/upgrade_smb_db_tools/dbupgrad e: line 4: 1765 Aborted


SolusVM Kurulumu (Resimli/Nasıl) CentOS/RHEL/Scientific 5/6 – How to install

Merhaba arkadaşlar,

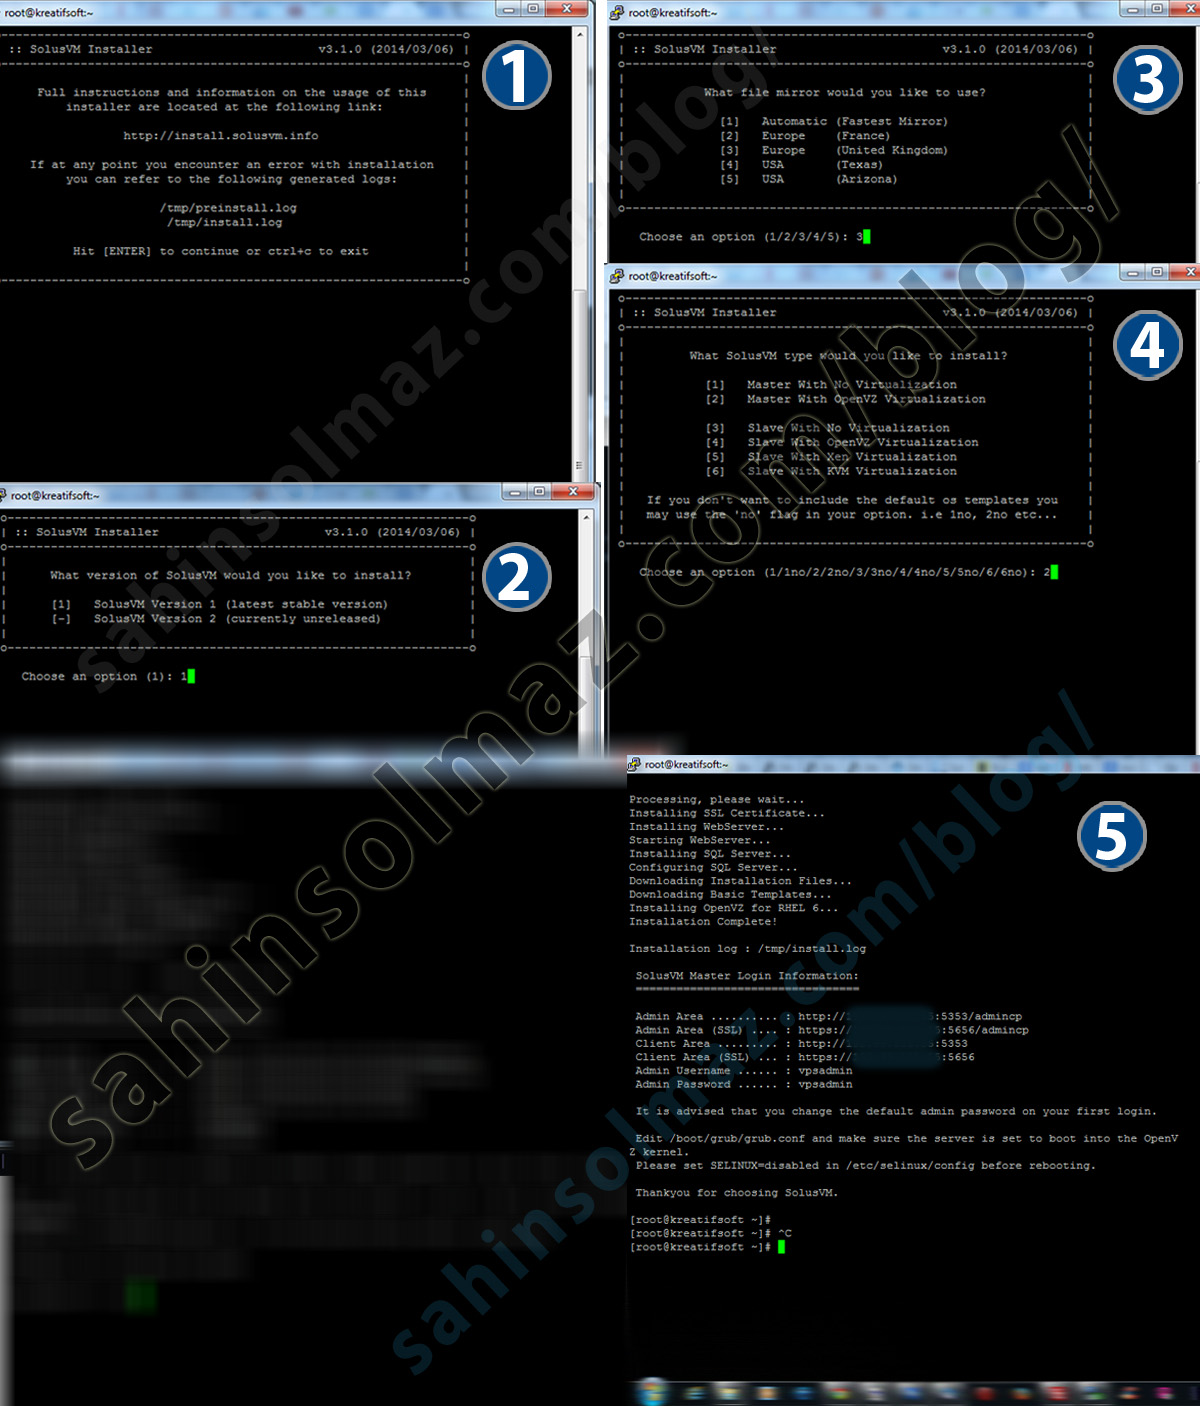
Bu yazımda sizlere SSH üzerinden CentOS/RHEL/Scientific 5/6 sunucularınız için SolusVM ‘in kurulumunu anlatacağım. Aslında SolusVM bunu kendi sayfasında zaten anlatmış ancak İngilizce olarak, aşağıda Türkçe anlatımı ve ilgili örnek görselleri mevcut:

kaynak: http://docs.solusvm.com/v2/Default.htm#Installation/Installing-Master.htm

SSH terminaline giriş yaparak sırasıyla aşağıdaki 3 komutu çalıştırıyoruz:

  1. wget http://soluslabs.com/installers/solusvm/install
    ilgili dosyayı sunucumuza indirdik
  2. chmod 755 install
    indirdiğimiz dosyaya izin verdik
  3. ./install
    ve kurulumu başlattık..
  4. Son olarak sizden selinux ‘u devre dışı bırakmanızı isteyecek aşağıdaki satırları inceleyerek bu işlemi sağlayabilirsiniz:
    SELINUX=disabled


    Selinux
     kaynak yolu: /etc/selinux/config
    kaynak: https://linuxmoz.com/centos-disable-selinux/

  5. Ve artık kurulum bitti, ekranda da gördüğünüz gibi:
    http://ipadresiniz.com:5353/admincp adresi üzerinden giriş yaparak gerekli işlemleri yapabilirsiniz ilk girişteki kullanacağınız bilgiler: vpsadmin ve vpsadmin olacaktır.
  6. Bildiğiniz gibi SolusVM ücretli yazılımdır ve SolusVM demo lisans nasıl alınır? diyorsanız: demo lisans (solusvm.com/pricing.php) talebinde bulunabiliyorsunuz yetkilerle ilgili hiç bir sıkıntı yok lakin süresi 15 gün ve bir e-posta adresi için yalnızca bir defa demo lisans alabiliyorsunuz.
  7. Ve işte adım adım kurulum ekran görüntüleri:
    Sırasıyla görselleri açıklamak gerekirse;

    1. Devam etmek için Enter, iptal etmek için CTRL+C
    2. 1 ile son kararlı sürümü kurmasını istiyoruz
    3. Kaynağı seçiyoruz, ben U.K yani 3. seçeneği seçtim.
    4. Ne olarak kullanmak istediğimizi soruyor, ben 2. seçeği yani Master (ana) OpenVZ sanallaştırmasını seçtim
    5. Kurulum bitti, teşekkürümüzü aldık fakat selinux görseli küçük bir hatadan dolayı yok fakat selinux nasıl kapatılır? diyorsanız yukarıda selinuxu nasıl devre dışı bırakacağınızdan bahsetmiştim, selinux kapatma ‘u unutmayın :)
  8. Kurulum için detaylı bir anlatım olduğunu düşünüyorum fakat kurulum ya da sonrası için sormak istediğiniz bir şey olursa bu yazının altından yorum atarak sorabilirsiniz, mümkün olan en kısa süre içerisinde yanıtlamaya çalışırım.Selamlar başarılar..SolusVM kurulum resminin büyük hali için üzerine tıklayabilirsiniz:
  9. SolusVM Kurulumu (ResimliNasıl) CentOSRHELScientific 56 - How to install


Bu makalenin cevap verdiği başlıca sorular şunlar olabilir:

  •  SolusVM nasıl kurulur?

  • How to install SolusVM?

  • SolusVM Demo lisans nasıl alınır?

  • Selinux Nasıl Kapatılır?

  • SolusVM demo lisans nasıl alınır?

Şu sıralar yoğuntan dolayı pek bir paylaşım yapamıyorum ama merak etmeyin halâ yörüngedeyim!

Selamlar, başarılar.. (:

Plesk Panel Outlook 530 5.7.0 Must issue a STARTTLS command first Çözümü

Merhabalar,

Bir türlü sevemediğim outlook programını kullanmak isteyen bir müşterimizin yaşadığı problemin Plesk Panel üzerinden gerçekleştirebileceğiniz çözümü sizlerle de paylaşmak istedim. Bu arada outlook bu hatayı verirken Thunderbird mail programı ve webmail üzerinden maillerinizi başarılı bir şekilde gönderebilirsiniz. Aşağıdaki çözüm kendi sunucusu olanlar içindir, hosting kullanıcıları sağlayıcıları ile iletişime geçmelidir.

Hata/Problem:

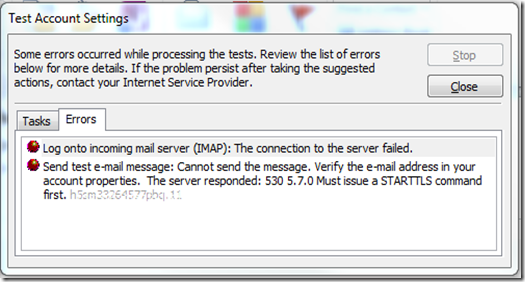
Outlook ayarlarını gerçekleştirirken Hesabınızın özelliklerindeki e-posta adresini doğrulayın. Sunucu yanıtı: 530 5.7.0 Must issue a STARTTLS command first. 

Send test e-mail message: Cannot send the message.  Verify the e-mail address in your account properties.  The server responded: 530 5.7.0 Must issue a STARTTLS command first. 

Sebep/Cause:

Sunucu postfix kaynaklı / server postfix

Çözüm/Solution:

  • Plesk panele giriş yapın /plesk login
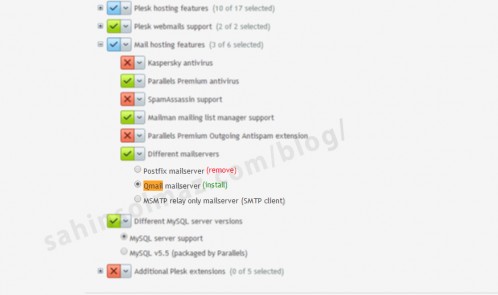
  • Araçlar -> Mail Server Settings sayfasını açın ve /Tools & Settings -> Mail Server Settings page
  • Postfix You can install and use another mail server <- tıklayın ve aşağıdaki görseli uygulayın. /click button (you can..) and to do list (img)Bu işlemle postfixin yerine qmaili aktifleştirmiş oluyoruz. / uninstall postfix, install qmail
  • 1plesk-postfix-qmail-install-uninstall
  • Hepsi bu kadar! :)


Thunderbird/Outlook IMAP Max_Connection Error Maksimum Bağlantı Hatası SSH

Merhabalar,

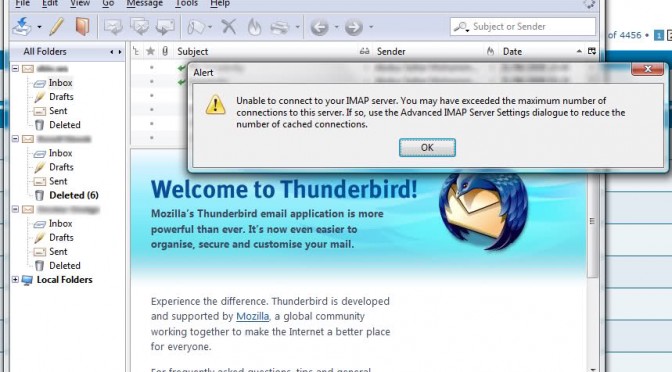
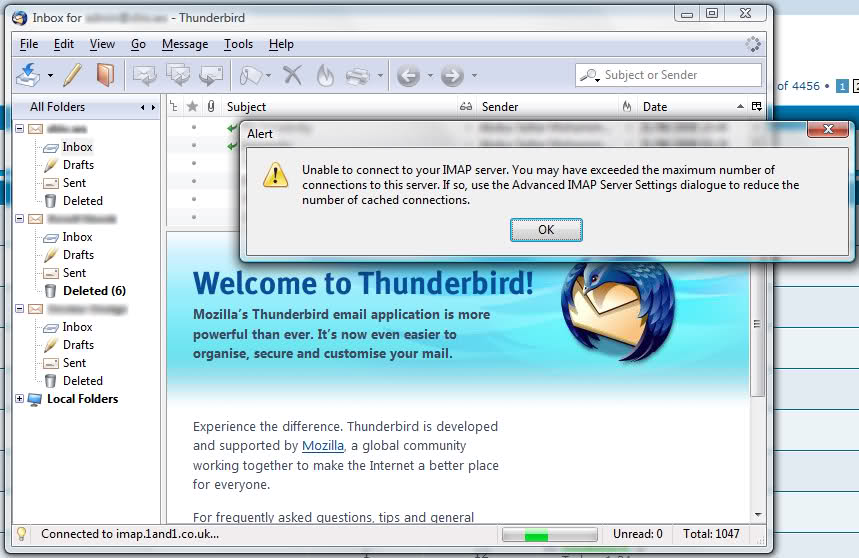
Sunuculardaki varsayılan bağlantı sayıları nedeni ile Thunderbird, Outlook ya da benzeri mail programlarında tercihiniz IMAP ve yaşadığınız problem max_connection yani maksimum bağlantı hatası ise aşağıdaki çözüm işinize yarayacaktır.

ThunderbirdOutlook IMAP Max_Connection Error Maksimum Bağlantı Hatası SSH

Eğer bir hosting kullanıcısı iseniz hosting sağlayıcınızla iletişime geçmelisiniz.


SSH root girişi yapın ve aşağıdaki komutları sırasıyla çalıştırın:

login to ssh: run the code


perl -p -i -e 's/^MAXDAEMONS=40/MAXDAEMONS=80/g' /etc/courier-imap/imapd
perl -p -i -e 's/^MAXPERIP=4/MAXPERIP=40/g' /etc/courier-imap/imapd

Son olarak değişikliklerin gerçekleşmesi için imap Continue reading

How to do add a DNS A record (Mail) Setting Server Panel Plesk 11? Setting up DNS

  1. Login to your Parallels Plesk Panel.
  2. Click on the Domains link on the left panel.
  3. Click on the Open in Control Panel link for the relevant domain name.
  4. Click on the Website & Domains tab.
  5. Click on the DNS settings icon.
  6. Click on the Add Record icon.
  7. Fill in your DNS record details and click on the Ok button.
  • For the row with the Record Type of NS, click your domain name, change the following, and then click OK:
    • Record type — NS.
    • Domain Name — Leave this field.
    • Name server — Type ns1.yoursite.com, where yoursite.com is your domain name.
  • For the row with the Host of ns.yoursite.com, where yoursite.com is your domain, click it, change the following, and then click OK:
    • Record type — A.
    • Domain Name — Type ns1.
    • IP Address — Enter your server’s IP address.
  • Click Add Record, complete the following fields, and then click OK:
    • Record type — Select NS.
    • Domain Name — Leave this field blank.
    • Name server — Enter ns2.yoursite.com, where coolexample.com is your domain name.
  • Click Add Record, complete the following fields, and then click OK:
    • Record type — Select A.
    • Domain Name — Type ns2.
    • IP Address — Enter your server’s IP address
  • Click Update.
  • Go to the Server tab in Plesk, and then, from the Server Management section, click Services Management.
  • Next to DNS Server (BIND), click Refresh. Allow a few minutes for the service to restart.


Change MySQL Reset/Update Password – Root SSH – Kullanıcı ve Şifre İşlemleri

1. Change root password:

su - root
passwd

2. Mysql root password: –> ERROR 1045 (28000): Access denied for user ‘root’@’localhost’

service mysqld stop

mysqld_safe --skip-grant-tables &
mysql -u root

mysql>
mysql> use mysql;
mysql> UPDATE user SET Password = PASSWORD ('yournewpassword') WHERE User='root';
mysql> FLUSH PRIVILEGES;
mysql> quit;

service mysqld start


———————————————————————————————-


3. Kloxo admin password login:

sh /script/resetpassword master {newpassword}


4. Reset Kloxo mysql password: –> Error “Could not open database connection.” when access to Kloxo

sh /script/fix-program-mysql {mysqlrootpassword}

or, enough:

sh /script/fix-program-mysql


5. Reset Horde password: –> Error “Could not open database connection.” Open file:

cat /home/kloxo/httpd/webmail/horde/config/conf.php

then find lines something like:

$conf['sql']['username'] = 'horde_groupware';
$conf['sql']['password'] = 'aVBq4yOrS';

then run:

service mysqld stop

mysqld_safe --skip-grant-tables &
mysql -u root

mysql>
mysql> use mysql;
mysql> UPDATE user SET Password = PASSWORD ('aVBq4yOrS') WHERE User='horde_groupware';
mysql> FLUSH PRIVILEGES;
mysql> quit;

service mysqld start


SOLVED – Windows Server More Than 2 Remote Desktop Sessions

sample q:

I’d like to have more than two concurrent remote desktop sessions. I have my users login to the headnode and submit their job from there, and my current install allows only two users to be connected at once. I’m on a college campus, so licensing wouldn’t be an issue, is there a way to add more CAL’s to make this possible?

SOLVED

http://technet.microsoft.com/en-us/library/cc753380.aspx

Applies To: Windows Server 2008 R2

You can configure the number of simultaneous remote connections that are allowed for a connection. Restricting the number of simultaneous remote connections can improve performance of the computer because fewer sessions are demanding system resources.

NOTE: If the RD Session Host role service is not installed on the computer, a connection can only allow a maximum of two simultaneous remote connections to the computer. (if you need information about installing the RD Session Host Role – then check here http://technet.microsoft.com/en-us/library/cc742813.aspx)

Use the following procedure to configure the number of simultaneous remote connections allowed for a connection.

Membership in the local Administrators group, or equivalent, on the RD Session Host server that you plan to configure, is the minimum required to complete this procedure. Review details about using the appropriate accounts and group memberships at http://go.microsoft.com/fwlink/?LinkId=83477.

To configure the number of simultaneous remote connections allowed for a connection

  1. On the RD Session Host server, open Remote Desktop Session Host Configuration. To open Remote Desktop Session Host Configuration, click Start, point to Administrative Tools, point to Remote Desktop Services, and then click Remote Desktop Session Host Configuration.

  2. Under Connections, right-click the name of the connection, and then click Properties.

  3. In the Properties dialog box for the connection, on the Network Adapter tab, click Maximum connections, enter the number of simultaneous remote connections that you want to allow for the connection, and then clickOK.

    If the Maximum connections option is selected and dimmed, the Limit number of connections Group Policy setting has been enabled and has been applied to the RD Session Host server.

You can also set the maximum number of simultaneous connections allowed for an RD Session Host server by applying the Limit number of connections Group Policy setting. This Group Policy setting is located in Computer Configuration\Policies\Administrative Templates\Windows Components\Remote Desktop Services\Remote Desktop Session Host\Connections and can be configured by using either the Local Group Policy Editor or the Group Policy Management Console (GPMC). Note that the Group Policy setting will take precedence over the setting configured in Remote Desktop Session Host Configuration.

source: http://social.microsoft.com/Forums/en-US/d4d9a518-210d-40e9-8638-77e23110cfb3/more-than-2-remote-desktop-sessions?forum=windowshpcitpros

SOLVED Internal error: filemng: opendir failed: Permission denied System error 13

Hata / Error: Internal error: filemng: opendir failed: Permission denied System error 13: Permission denied

Message filemng: opendir failed: Permission denied System error 13: Permission denied
File Agent.php
Line 212
Type PleskUtilException

Plesk panelin erişim izninin olmaması sebebi ile bu hata ile karşılaşılmaktadır, çok önemli bir problemdir ancak aşağıdaki çözüm işinize yarayacaktır.

Çözüldü / Solved:

# chmod 755 /var/www/vhosts/site.com/httpdocs
# /usr/local/psa/admin/sbin/httpdmng --reconfigure-domain YourDomain.com

Çözüldü/Solved – PHP configure: error: xml2-config not found

PHP configure: error: xml2-config not found. Please check your libxml2 installation.

Are you attempting to compile PHP on Linux and running into, “configure: error: xml2-config not found. Please check your libxml2 installation.”

It’s easy to fix, simply install the libxml2-development package by issuing the following command on your appropriate Linux distribution.

 Fixing on Red Hat / CentOS / Fedora via Yum
 yum install libxml2-devel
Fixing on Debian / Ubuntu / Linux Mint via apt-get
 apt-get install libxml2-dev